· Arduino · 6 min read
Why and How to Switch from Arduino IDE to PlatformIO: A Complete Beginner’s Guide
The Arduino IDE is simple and perfect for beginners — but what happens when your projects get bigger, or you want professional features like code completion, library management, and multi-board support? Learn why PlatformIO is the next step and discover how to switch your Arduino workflow without starting over.
Introduction
The Arduino IDE has been a game-changer in making embedded development accessible to everyone. Its single-window interface and straightforward workflow help countless beginners take their first steps into programming microcontrollers.
But as your projects evolve — adding more sensors, modules, or targeting different boards — you may find the Arduino IDE increasingly limited. Lack of proper code navigation, manual library management, and no built-in support for multiple targets can slow down your work.
This is where PlatformIO comes in: an advanced, open-source ecosystem designed for professional yet approachable embedded development. In this guide, we’ll explain what PlatformIO is, why you might switch, and how to move your existing Arduino projects to PlatformIO without frustration.
What Is PlatformIO?
PlatformIO is an open-source ecosystem built for professional embedded development, designed to support hundreds of boards — from Arduino and ESP32 to STM32 and Nordic chips.
At its heart, PlatformIO combines:
- A powerful build system that manages toolchains automatically.
- Integrated library management to fetch and update dependencies easily.
- Unified project structure, making collaboration and scaling easier.
- Support for advanced workflows: unit testing, debugging, CI/CD pipelines, and multi-board builds.
PlatformIO can run standalone or as an extension inside popular editors like Visual Studio Code, providing modern features like code completion, refactoring tools, and integrated Git support.
Why Switch from Arduino IDE to PlatformIO?
The Arduino IDE is beginner-friendly, but its simplicity can become a limitation for larger or long-term projects. Here’s what PlatformIO offers beyond the Arduino IDE:
Modern Code Editing
Using Visual Studio Code with PlatformIO brings full code completion, syntax highlighting, and context-aware suggestions — helping catch typos and errors before compilation.
Robust Library Management
No more manually downloading and unzipping libraries. Add dependencies with a single line in your platformio.ini file, and PlatformIO handles updates automatically.
Multi-Board and Multi-Framework Support
Build and upload the same project to different boards (Arduino Uno, Nano, ESP32, etc.) from one place — great for prototyping and porting projects.
Version Control and Scalability
PlatformIO’s structured project layout makes it easier to use Git, collaborate with others, and separate code into reusable modules.
Advanced Features for Growth
From hardware debugging to automated testing and CI/CD workflows, PlatformIO scales as your skills and projects grow.
Cross-Platform Consistency
PlatformIO works seamlessly on Windows, macOS, and Linux, ensuring the same workflow across different systems.
For beginners moving beyond simple sketches — or anyone looking to write cleaner, maintainable code — these features add long-term value.
What You’ll Need to Get Started
Before switching, make sure you have:
- Visual Studio Code (VSCode) installed on your machine.
- PlatformIO IDE extension installed inside VSCode.
- An existing Arduino project you’d like to migrate (or you can start fresh).
- Basic familiarity with the Arduino IDE and programming concepts.
You don’t need advanced C++ skills or special hardware to get started.
Understanding PlatformIO’s Project Structure
Unlike the Arduino IDE’s single .ino sketch file, PlatformIO organizes code into a standardized directory structure. This structure helps manage larger projects and makes them portable.
A typical PlatformIO project looks like this:
MyProject/
├── platformio.ini
├── src/
│   └── main.cpp
├── lib/
├── include/
└── .pio/platformio.ini: Configuration file for boards, frameworks, and libraries.src/: Source code files (main.cppinstead of.ino).lib/: Optional folder for custom libraries.include/: Header files if needed..pio/: Auto-generated build files (don’t edit).
How to Switch: From Arduino IDE to PlatformIO
Let’s walk through the process of moving your first Arduino sketch to PlatformIO. For clarity, we’ll assume your original sketch is Blink.ino.
Install Visual Studio Code and PlatformIO
Download and install Visual Studio Code. Inside VSCode, open the Extensions panel, search for PlatformIO IDE, and install it.
Once installed, you’ll see a new alien-shaped icon in the sidebar — that’s PlatformIO Home.
Create a New PlatformIO Project
Open PlatformIO Home and select “New Project.” Enter a project name (e.g., “BlinkProject”). Choose your board from the list — for example, Arduino Mega 2560 — and set the framework as Arduino.
Click “Finish,” and PlatformIO will generate the project structure.

Understand File Types: .ino vs .cpp
PlatformIO prefers main.cpp under the src/ folder. You’ll need to:
- Copy your sketch code into
main.cpp. - Add
#include <Arduino.h>at the top to include the Arduino core functions.
For example, your new src/main.cpp will look like this:
#include <Arduino.h>

void setup() {
  pinMode(LED_BUILTIN, OUTPUT);
}

void loop() {
  digitalWrite(LED_BUILTIN, HIGH);
  delay(1000);
  digitalWrite(LED_BUILTIN, LOW);
  delay(1000);
}
That’s it — your first PlatformIO project is ready.
Build and Upload Code
Use the PlatformIO toolbar (checkmark icon) to build your project. Click the right arrow icon to upload it to your Arduino board.
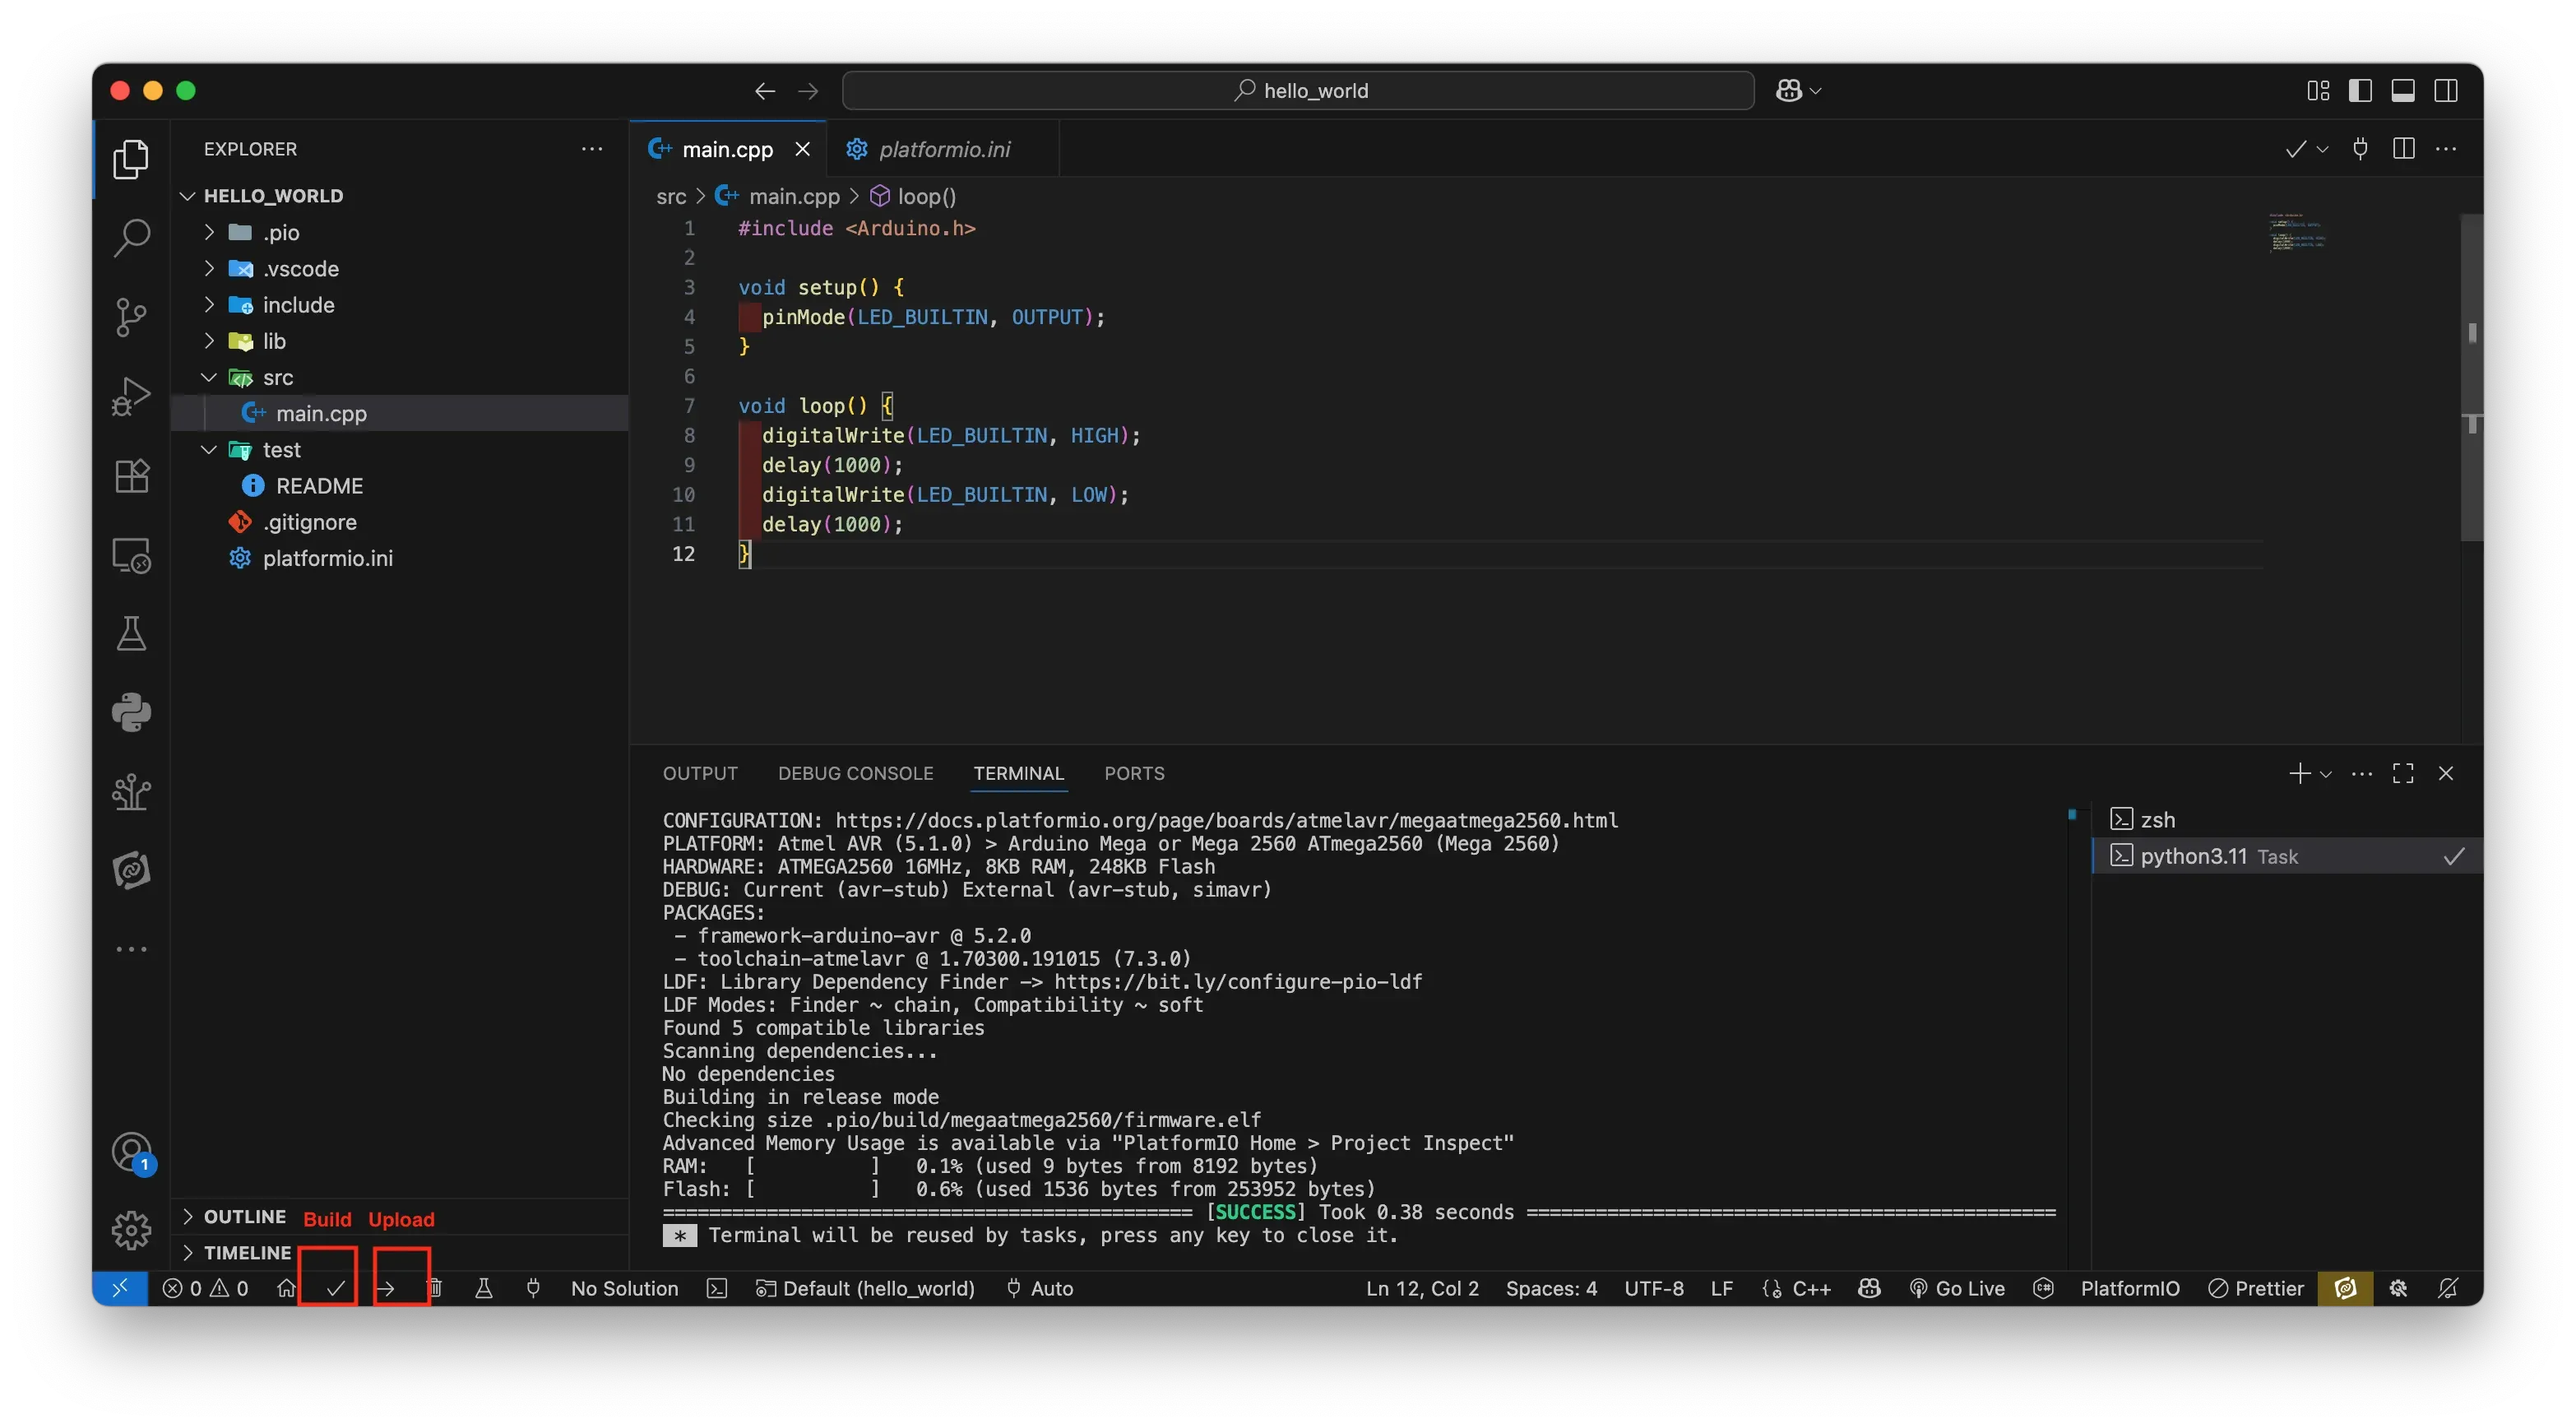
The integrated terminal at the bottom shows the build process, size report, and upload status.
Use the Serial Monitor
PlatformIO includes a built-in serial monitor. Click the plug icon in the toolbar or run the command in the terminal to see output from Serial.print().
You can configure baud rates and ports in platformio.ini.
Adding Libraries the Right Way
PlatformIO replaces the Arduino IDE’s manual library downloads with a modern dependency system.
In your platformio.ini, add:
lib_deps =
    ArduinoJson
    Adafruit NeoPixel
When you build, PlatformIO automatically downloads and integrates these libraries — no ZIP files needed.
This makes projects more portable and avoids “it works on my machine” problems.
Advanced Tips as You Grow
PlatformIO unlocks advanced workflows when you’re ready:
- Multi-environment builds: Compile for multiple boards from the same project.
- Unit testing: Test code before flashing to hardware.
- Continuous Integration (CI): Automatically build firmware on services like GitHub Actions.
- Hardware debugging: Step through code on supported boards.
- Pre/post build scripts: Automate tasks like firmware packaging.
You don’t need to master these immediately — but knowing they’re available makes PlatformIO future-proof.
When to Stick with the Arduino IDE
For absolute beginners writing short, single-file sketches or exploring ideas, the Arduino IDE remains a great starting point.
Switch when you:
- Feel limited by the Arduino IDE’s single-file model.
- Want better code navigation and editing.
- Need to manage libraries cleanly.
- Plan to share or maintain projects long-term.
- Work across different boards and frameworks.
Tips for a Smooth Transition
- Start small: migrate a simple sketch like Blink before moving larger projects.
- Keep your Arduino IDE installed — you can switch back anytime.
- Use Git from the start: version control helps track changes and mistakes.
- Explore the PlatformIO documentation; it’s well-organized and beginner-friendly.
Conclusion
Switching from the Arduino IDE to PlatformIO doesn’t mean abandoning what you know — it builds on it. With modern tools, powerful library management, and professional workflows, PlatformIO helps you move from hobbyist sketches to scalable, maintainable projects.
Whether you stay with Arduino boards or branch into ESP32, STM32, or Nordic chips, PlatformIO provides a consistent and flexible development experience.
Your journey into professional embedded development can start today — by blinking that same LED, but this time, in PlatformIO.
Next in This Series
In upcoming posts, we’ll explore:
- Managing libraries in PlatformIO
- Adding multiple board environments
- Debugging and serial monitoring
- Automating builds with CI/CD
Stay tuned.
- arduino
- platformio
- embedded-development
- beginner-guide
- vscode
- workflow